Sakai
Duke's online classroom environment that provides faculty, staff, and students with tools to support teaching and learning activities.


- Go to http://sakai.duke.edu
- Click and log in with your NetID and password.
- Once logged in, you should see the Welcome screen.
There are several ways to add a syllabus within Sakai. Choose the method that works the best for your course.
Find and click the Syllabus button in the Tool Bar.
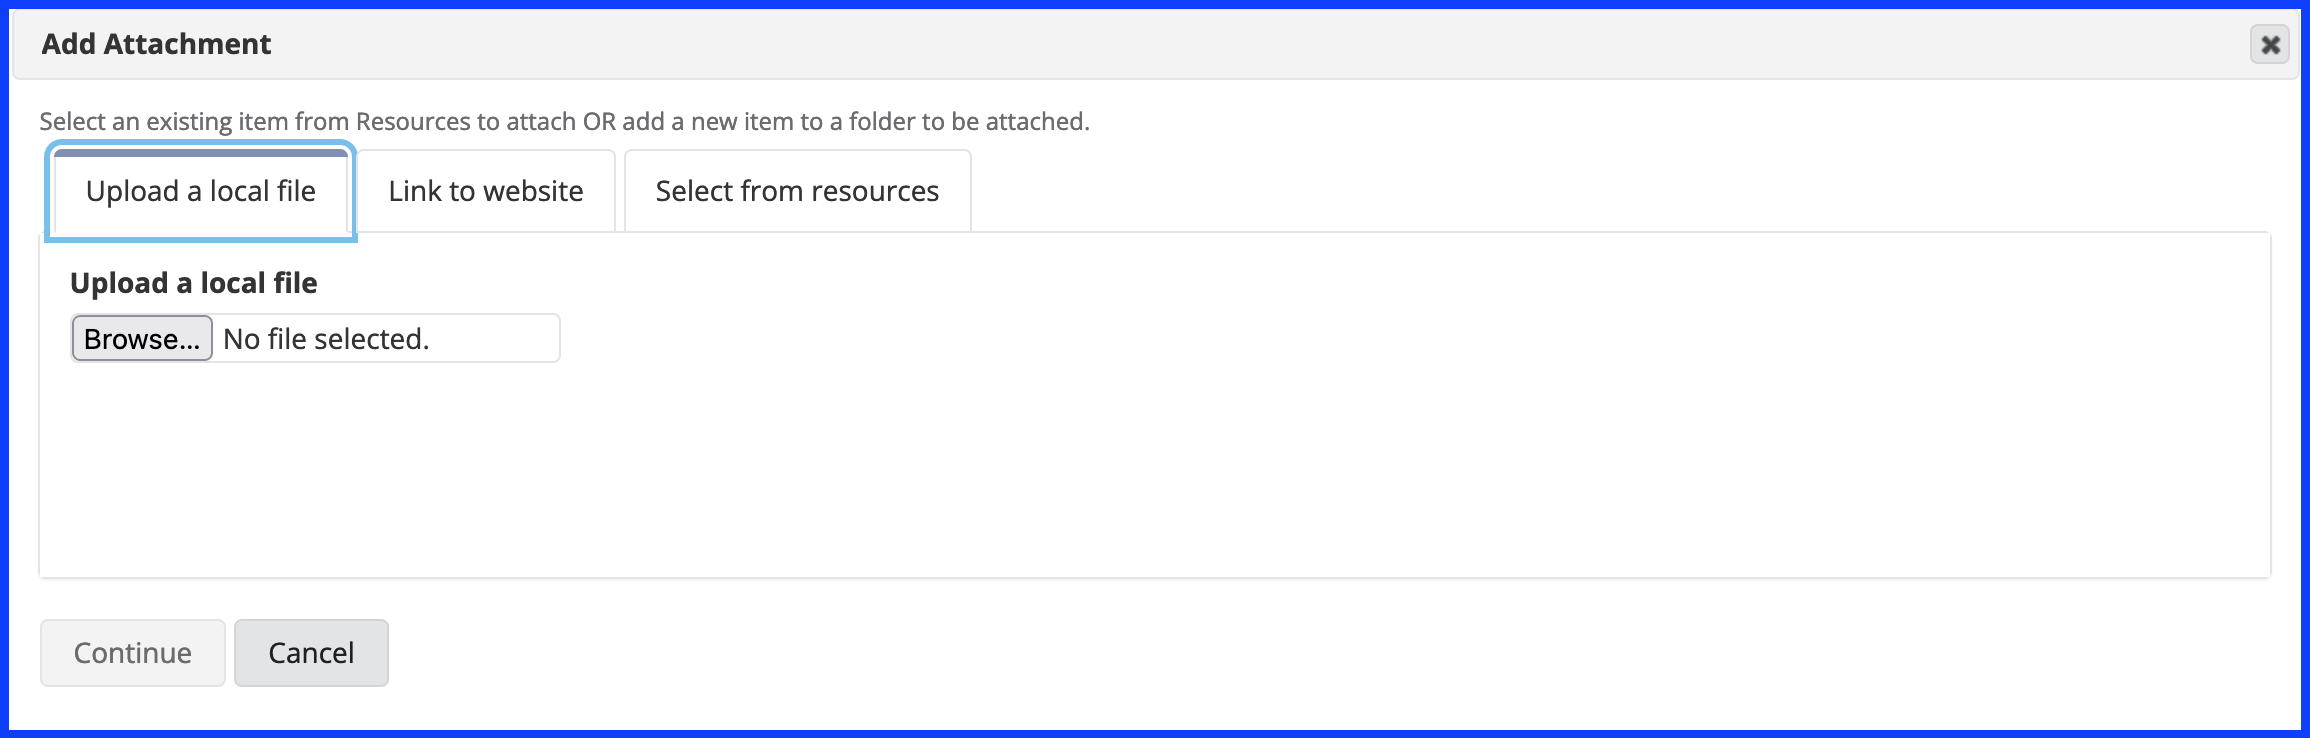
1. Add a Syllabus as a File Attachment
- Upload a Local File
- PDFs will open in a new tab within the student's browser for viewing and/or printing.
- Word Docs will automatically download and open within Microsoft Word for viewing and/or printing.
OR
2. Cut & Paste a Syllabus from a Document
- Paste directly into the Editor box
- The Syllabus will display within Sakai instead of opening additional tabs or applications.
The Email tool allows user to send an email message to site participants by role, section, or group, and also provides a field for specifying non-site participant email addresses. NOTE: Previous emails are saved and can be accessed using the Email Archive button located in the Tool Bar.
Find and click on the Email button in the Tool Bar.
- Select the recipients in the To: field.
- All = Every participant enrolled on the site roster.
- Roles = Select from a list of possible participant roles (Course Builder, Instructor, Student, Teaching Assistant, Visitor)
- Sections = Subset of participants defined by the instructor (How to Create a Section).
- Groups = Subset of participants defined by the instructor (How to Create a Group).
- Type a Subject line, and Attach a file, if necessary.
- Compose your message in the Rich Text Editor.
- Review and select the appropriate options below the editor before clicking to send.
- Click Send Mail.

Once logged in, find and click on the course you want to publish:
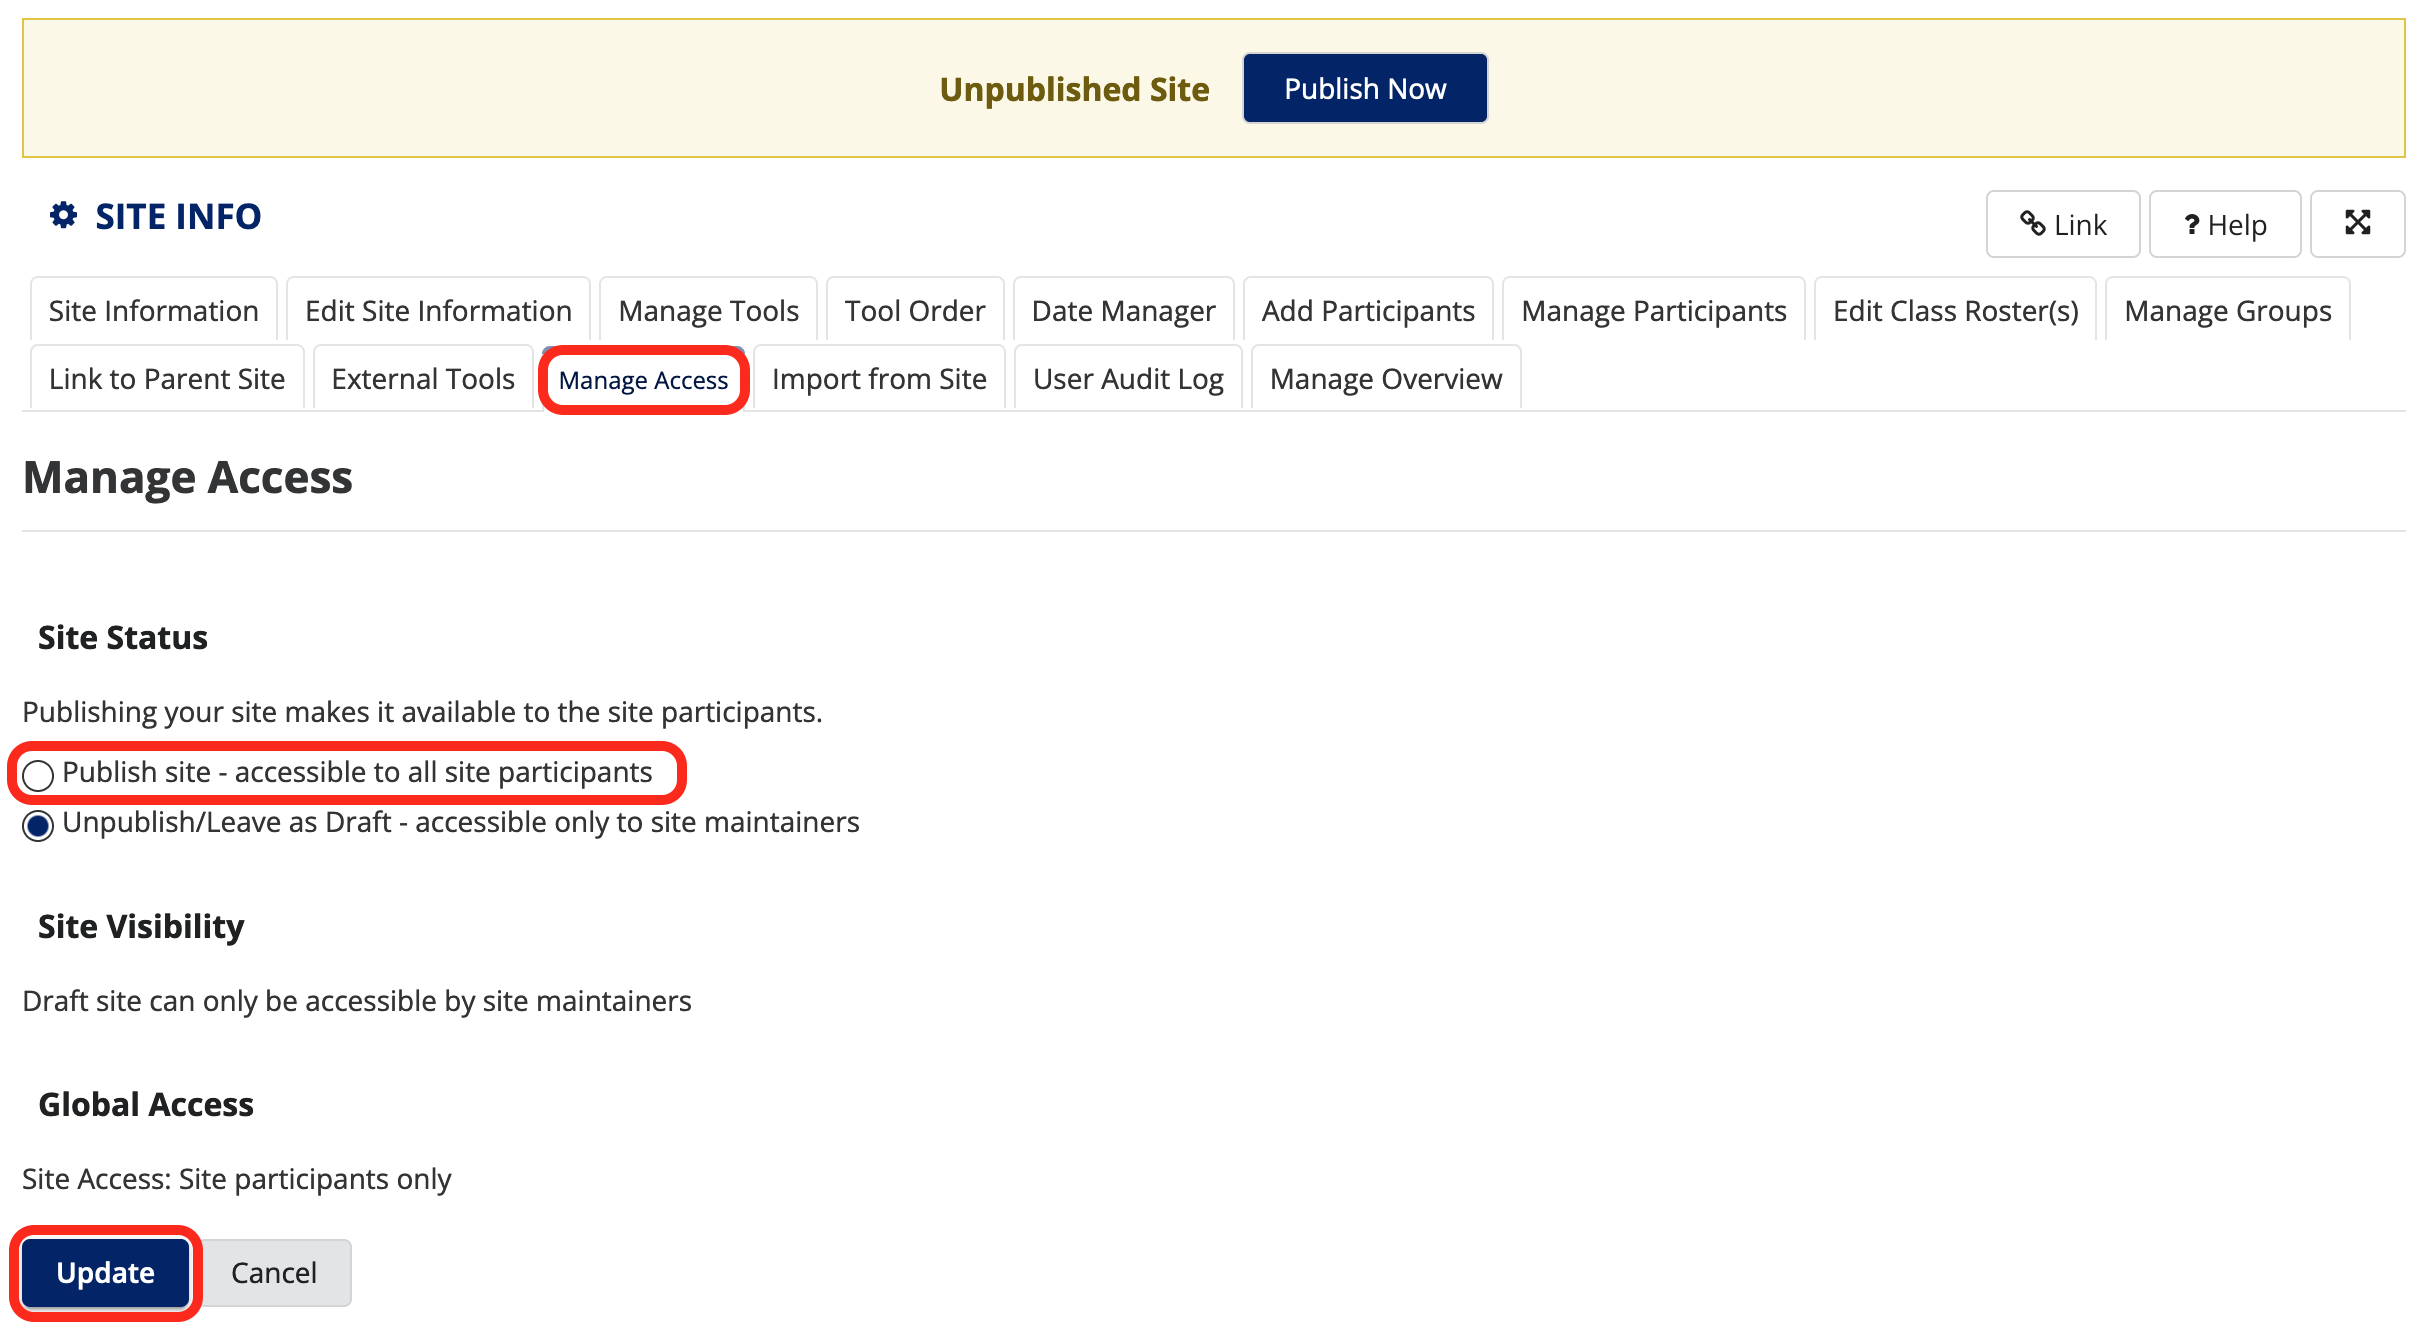
- If the site is not yet published, you will see "Unpublished Site" highlighted in the banner across the top of the page.
- Simply click the "Publish Now" button to make the site "live".
- NOTE: A notification is NOT automatically sent to the students/participants on your site roster when it is published. Consider sending an email, or posting an announcement in order to communicate that the site is now active.

OR
- Find and click Site Info located in the Tool Bar (lefthand column).
- Find and click Manage Access among the available tabs.
- Under the Site Status sub-heading, select Publish Site - accessible to all site participants.
- Click Update to save the changes and make the site “live”.
Courses will be listed as buttons across the top of the screen (aka, Favorites Bar). Additional courses are listed under the View More Sites tab.

- Click on the View More Sites button, and a drop-down window will display all Sakai sites with which your profile is associated.
- Sites will be differentiated chronologically by term.
- Additionally, you may or may not see Project Sites listed here as well.
- Select sites to include on your Favorites bar by clicking to highlight the star adjacent to the site's title.
- You can also deselect previously starred sites in order to remove them from your Favorites Bar.
- If you would like to arrange your sites in a specific order:
- Click the Organize Favorites tab at the top of the window.
- Drag and drop the sites into the order of your preference.
- Click the X in the right-hand corner to close the window.
- Click Reload to see your updated favorite sites.

All active tools for a site will be listed along the left-hand column known as the Tool Bar. The default list of tools contains the most commonly used Sakai tools per Duke Law faculty input. These tools can be removed and others added in order to customize each site to your preference.
Find and click the Site Info button in the Tool Bar.
- Click the Manage Tools tab
- Click the adjacent checkbox(es) to select tools to add to your Tool Bar. (on the left)
- Conversely, to remove tools, click the red "X"s adjacent to the tools listed. (on the right)
- When finished, scroll to the bottom of the screen and click Continue.
- A new page will load.
- To Confirm the changes, scroll to the bottom of this page and click Finish.

Importing content from previously developed sites can help to expedite the course-building process. This allows you to reuse content uploaded and created within tools like Announcement, Resources, Lessons, and Assignments.
Click into the site where you wish to import content.
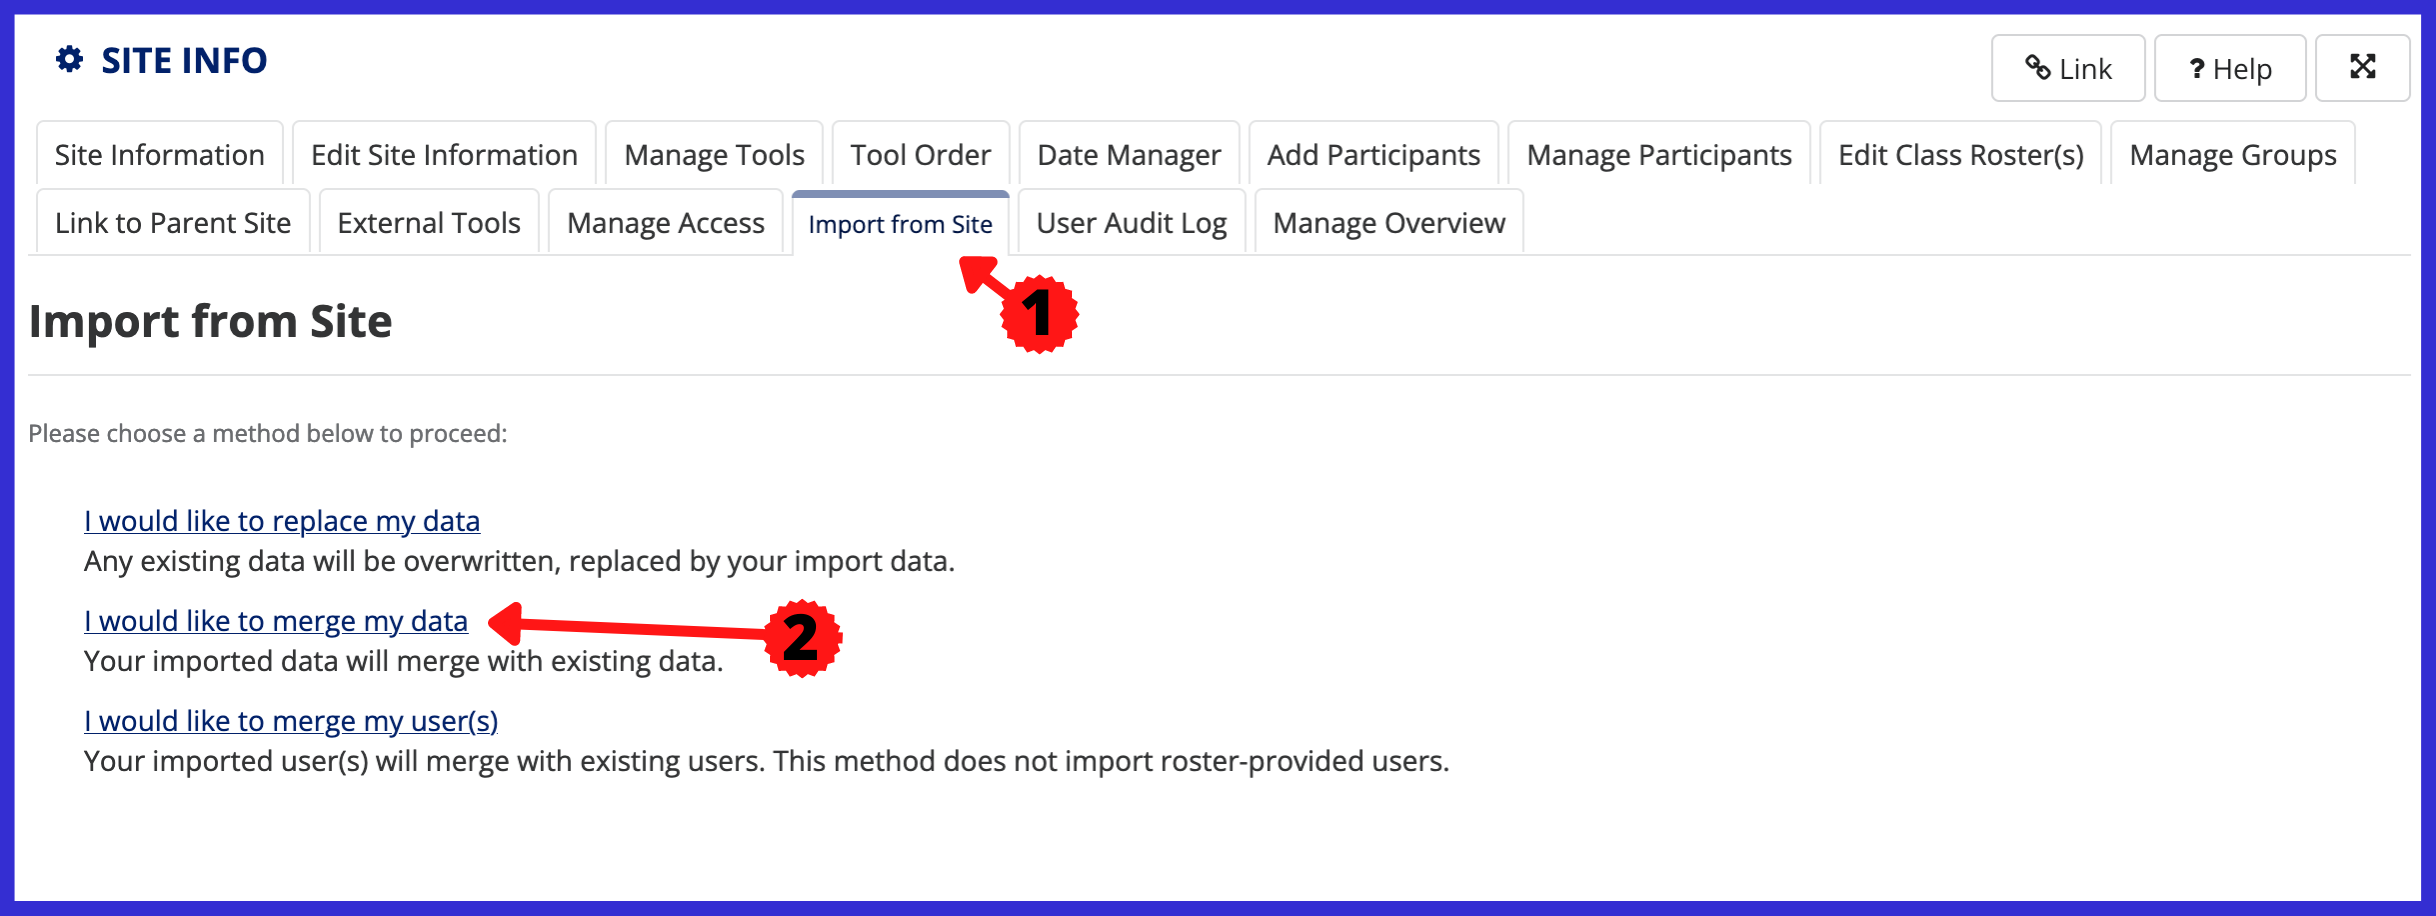
Find and click the Site Info button in the Tool Bar.
- Click the Import from Site tab.
- Select “I would like to merge my data”.
- Select the course site(s) from which you want to import data, and click Continue.
- Check the box(es) next to each tool you would like to import, and click Finish.
- You will receive an email when the import is completed.
The Announcements tool allows for the delivery of messages to the entire class, to groups, or to specific sections within the class. Participants will see the Announcement message displayed in the Announcements area of their Home area, as well as within the course itself. These messages can be set to show immediately or to show during specific dates. Email notifications can be sent to alert participants of the Announcement message.
Find and click the Announcements button in the Tool Bar.
- Click the Add tab
- Give your announcement a Title
- Type your announcement into the Body (aka, Rich Content Editor)
- Advanced Tip: Record a video and upload it to Warpwire, then post a video announcement instead of a simple typed message.
- Scroll down and select your options for Access, Availability, and decide whether or not to add Attachments.
- Choose your Email Notification preference for the announcement.
- Click to Post Announcement.
- Note: Use the Preview button for a final look before posting.

How Students Submit a Response Paper in Assignments (written for a student)
- Click the “Assignment” tool on the left hand side bar.
- A list of assignments should display. Click the Assignment that should be completed.
- A response box will pop up. Here you are able to either answer with a written text description in the text box or add an attachment. Students should respond assignment prompt as directed by the instructor (either view the text box or with an attachment).
- Once you are finished writing in the text box or uploading an attachment. Press the “Submit” button to finalize your response.
- If the submission was completed successfully a message will pop up saying “You have successfully submitted your work. You will receive an email confirmation containing this information.”
How to Grade Assignments (written for an instructor)
1. Click the “Assignments” tool on the left hand sidebar.
2. A list of assignments should display. Under each assignment is three options “Edit”, “Duplicate”, and “Grade”.
3. Click the “Grade” option under the Assignment you want to grade.
4. A list of students will appear. From this screen you can see the student name, if the assignment was submitted, the status of the assignment, the grade, and if the grade was released to the student.
5. To go into grading mode, click the “Grade” option listed under a student’s name.
6. In this screen you should see :
Assignment Submission (what the student typed in)
- Submitted Attachments (what the student uploaded).
Under these are areas for:
- Instructor Summary Comments (this is where you give student feedback)
- Attachment to Return with Grade (this is where you can upload a document with feedback)
- Grade (this is where you enter in the student’s grade)
9.After filling in all or none of the items listed in #8, select one of three buttons:
- Save and Don’t Release to Student (use this when you want to release all student grades at one time)
- Save and Release to Student (use this to allow the student to see his/her grade right away…you will have to do this for every student)
- Preview (use this to preview what your response will look like)
- Cancel (use this to cancel everything you have done. Your work will not be Saved).
- 10. You can then move to the next student, previous student, or return to list by choosing a button on the right hand side.
Below are student directions for working with Forums in Sakai.
How to post a new message in Forums
Once you have logged into Sakai, you should see the courses you are assigned listed as tabs at the top of the screen. Select the tab for the course with which you want to work.
- In the left side bar, select the “Forums” tool.
- Under the Forum list, select the appropriate Forum topic to which you would like to post.
- Once on the new screen, select “Start a New Conversation”.
- An editing box should pop up. Be sure to enter in a title for your thread/post and type a message into the open text box.
- After completing the message and double checking the accuracy, press the “Post Message” button to submit your message to Forums.
Add an attachment
If you want to add an attachment to your message follow instructions 1-4 and then press the “Add Attachments” button. A box will appear that allows you to explore your computer for the appropriate file to load. After the attachment has loaded, you will need to click on “Post Message” to submit the message and attachment.
Cut and paste something from the internet
It is possible to cut-and-paste text from the internet into a Forum message.
- Starting at step 4 of “How to Post a New Message in Forums”.
- Open a new tab or window with the website from which you want to copy text.
- Left click and drag the cursor over the desired section of text.
- Press ctrl+c to copy the text.
- Go back to the Sakai page, and click in the open text box.
- Press ctrl+v to paste the text.
- Follow all other directions from “How to Post a New Message in Forums”.
To cut-and-paste from a Word document, please use the “Paste from Word” icon that is shaped like a clipboard with a “W”.
For images you will need to take a screenshot and add as an attachment instead of cutting and pasting.
*Please remember to credit your sources.*
How to reply to a message in Forums
Once you have logged into Sakai, you should see the courses you are assigned listed as tabs at the top of the screen. Select the tab for the course with which you want to work.
- In the left side bar, select the “Forums” tool.
- Under the Forum list, select the appropriate Forum Topic to which you would like to reply.
- Next to the comment you want to reply, select “Reply” next to the name/date line.
- Follow directions 4 and 5 from “How to Post a New Message in Forums” to complete the reply.
How to batch download answer attachments from Tests and Quizzes
- Start in Test and Quizzes
- Select ”Published Copies” tab.
- Find the title of the assessment.
- In the dropdown box next to your chosen assessment, select “Scores”.
- Click on “Questions” in the grey bar.
- Review the list to see who has and who has not submitted the assignment in the correct amount of time.
- To get a zip file of all the attached student responses, click Download All.
*
Course Retention Policy
Please note that Duke has introduced a 5-year retention policy; after 5 years, all course site content is deleted and no longer accessible. Please contact webupdates@law.duke.edu if you need assistance exporting documents or data.